Thursday 21 December 2017

repmgr | PostgreSQL replication fail-over manager .

repmgr is a suite of open-source tools to manage replication and failover within a cluster of PostgreSQL servers. It enhances PostgreSQL's built-in replication capabilities with utilities to set up standby servers, monitor replication, and perform administrative tasks such as failover or switchover operations.

repmgr 4 is a complete rewrite of the existing repmgr codebase, allowing the use of all of the latest features in PostgreSQL replication.
PostgreSQL 10, 9.6 and 9.5 are fully supported. PostgreSQL 9.4 and 9.3 are supported, with some restrictions.


repmgr is distributed under the GNU GPL 3 and maintained by 2ndQuadrant.

Let's start with installation of of repmgr

I am assuming that you have already install PostgreSQL Server .

Step 1 : -
Download source code of repmgr from below link .

https://github.com/2ndQuadrant/repmgr/archive/master.zip


Step 2 : -


unzip master.zip
cd repmgr-master/

##Make sure you have configured environment variable for PostgreSQL if not then do it manually as below .


export PATH=/usr/local/Postgresql9.6/bin/:$PATH
export LD_LIBRARY_PATH=$LD_LIBRARY_PATH:/usr/local/Postgresql9.6/lib/


./configure --prefix=/usr/local/Postgresql9.6/make
make install


mkdir /etc/repmgr/chmod 700 -R /etc/repmgr/chown postgres:root -R /etc/repmgr/cp repmgr.conf.sample /etc/repmgr/repmgr.conf
Step 4 : - 
Manage pg_hba.conf and postgresq.conf paramaters which required for replication [I using replication slots]
Create on user for replication and repmgr 

create user repmgr superuser ;
create database repmgr with owner repmgr;
Required parameters in postgresql.conf for replication slots 
listen_addresses='*'
max_wal_senders = 5
wal_keep_segments = 100
archive_mode = always
archive_command = '/bin/true'
wal_level = logical
hot_standby=on
max_replication_slots=5

shared_preload_libraries = 'repmgr'
-- Restart PostgreSQL service 
create on replication slot 
SELECT * FROM pg_create_physical_replication_slot('repmgr_test_slot');
Required entries in pg_hba.conf for replication slots 
local replication repmgr trust
host replication repmgr 127.0.0.1/32 trust
host replication repmgr 192.168.1.0/24 trust

local repmgr repmgr trust
host repmgr repmgr 127.0.0.1/32 trust
host repmgr repmgr 192.168.1.0/24 trust
Step 5 : -
Configure/adjust repmger.conf parameters as per need .
repmger.conf is created in step 2 .
node_name = 'Master'
conninfo = 'host=current_host_IP user=repmgr dbname=repmgr'
data_directory=/usr/local/Postgresql9.6/data/
promote_command='/usr/local/Postgresql9.6/bin/repmgr standby promote -f /etc/repmgr/repmgr.conf'
follow_command='/usr/local/Postgresql9.6/bin/repmgr standby follow -f /etc/repmgr/repmgr.conf -W --upstream-node-id=%n'
use_replication_slots = yes
pg_bindir=/usr/local/PostgreSQL9.6/bin #Set this paramater if env varialbe is not set .
log_level=DEBUG
log_facility=STDERR
log_file='/tmp/repmgr.log'
failover=automatic
priority=60
reconnect_attempts=2
reconnect_interval=5
monitoring_history=yes
Step 6 :- 
Resgister primary/master server with repmgr as shown in below image 
/usr/local/Postgresql9.6/bin/repmgr -f /etc/repmgr/repmgr.conf  primary register
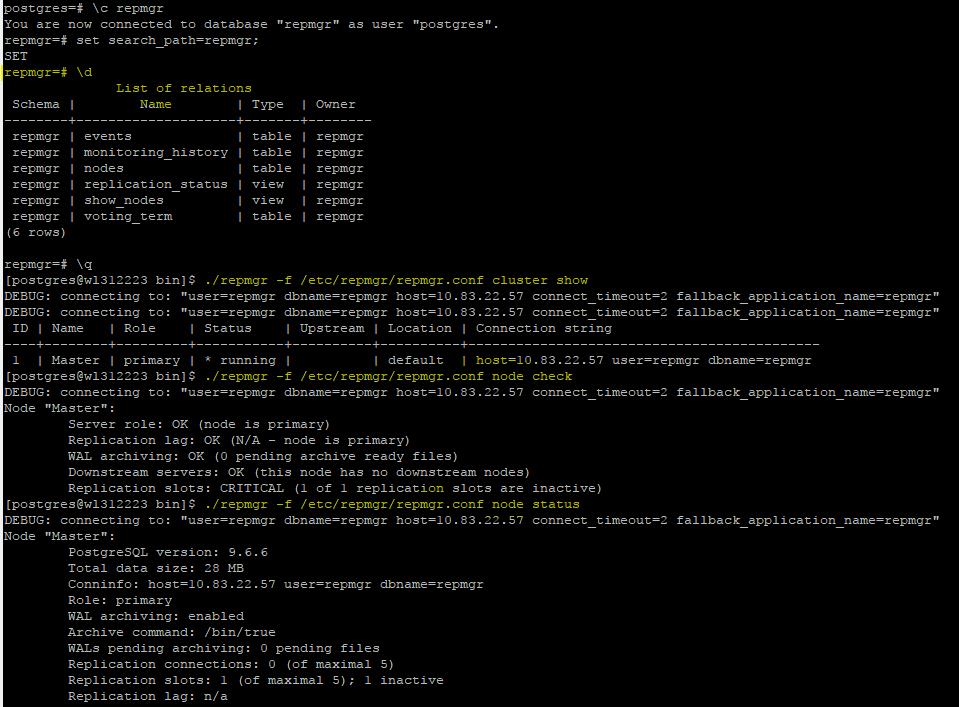
Check schema and status of


Step 7 : -
Install repmgr on slave server as given in step 2 .
Make parameter changes on slave server as given in step 5 .
Create/Build a clone/replica by using repmgr .
/usr/local/Postgresql9.6/bin/repmgr -f /etc/repmgr/repmgr.conf --force -h 10.83.22.57 -d repmgr -U repmgr --verbose standby clone
It will create recovery.conf by it's own .Just verify it once .
Step 8 : -
Start slave/replica server .
Register slave/replica node .
repmgr -f /etc/repmgr/repmgr.conf standby REGISTER
Step 9 : - 
Start repmgd daemon to keep server state monitoring .
repmgrd is a management and monitoring daemon which runs on each node in a replication cluster. It can automate actions such as failover and updating standbys to follow the new primary, as well as providing monitoring information about the state of each standby.

Lets start this server on both server as show in below image .

repmgrd -f /etc/repmgr/repmgr.conf --verbose monitoring_history


Note: For permanent operation, we recommend using the options -d/--daemonize to detach the repmgrd process, and -p/--pid-file to write the process PID to a file.

Step 10 : - 
Stop master DB service to perform automatic fail-over  
repmgrd will start automatic fail-over . 
By Taking clone of New primary server you can build new replica .
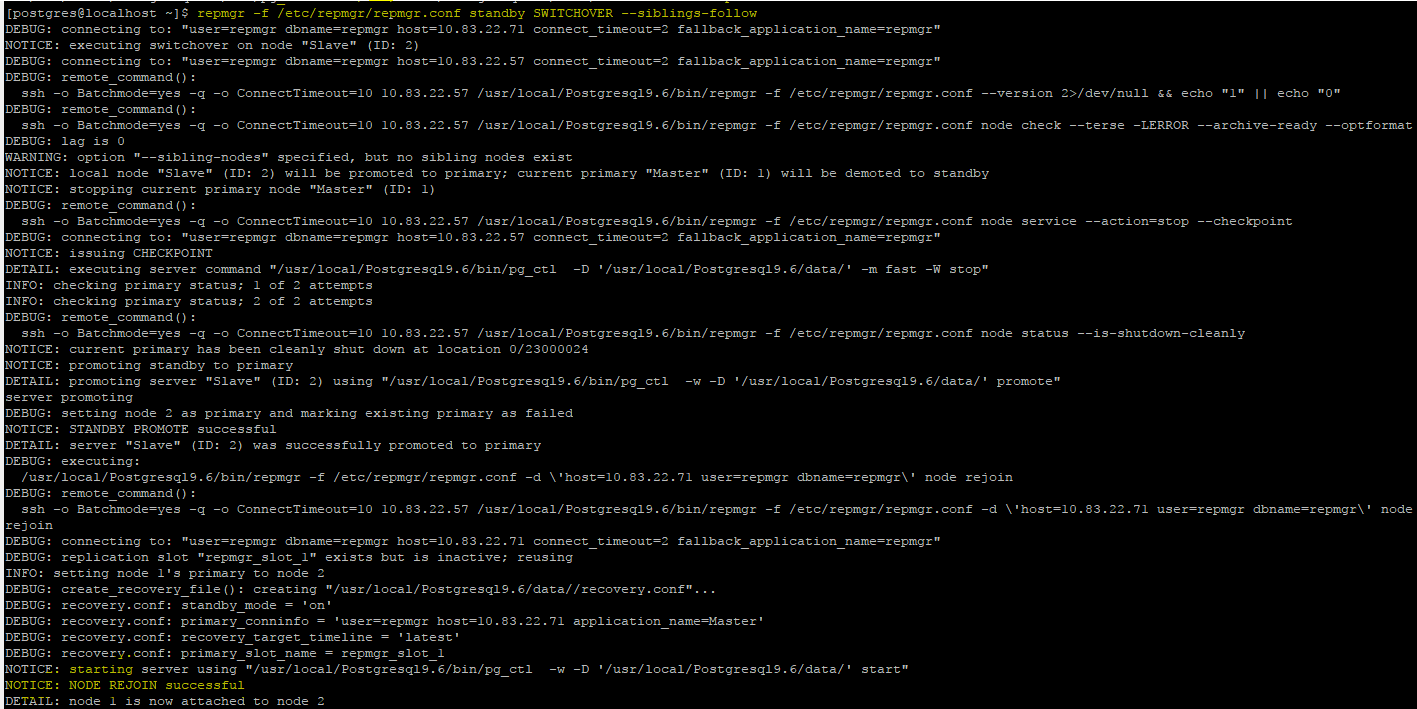
Step 11 :- 
Perform switch-over .
You need to execute switch over command from standby server .
First do dry-run ,Then start switch-over .
repmgr -f /etc/repmgr/repmgr.conf standby SWITCHOVER --siblings-follow --dry-run
repmgr -f /etc/repmgr/repmgr.conf standby SWITCHOVER --siblings-follow 


Before Switch-over


After Switch-over 


Step 12 :- 

Node rejoin 

While doing switch-over this did't get performed well .My replica server become master but old master did't get .

In that case i want to join this old master as a slave/replica server with my new master server .

Execute this command on that host where server is down.

repmgr -f /etc/repmgr/repmgr.conf node rejoin --force-rewind  -d 'host=10.83.22.57 dbname=repmgr user=repmgr' 

Host =  it is ip address of new primary server .


Tuesday 12 December 2017

pg_top | PostgreSQL

pg_top is 'top' for PostgreSQL. It is derived from Unix Top. Similar to top,
pg_top allows you to monitor PostgreSQL processes. It also allows you to:

    * View currently running SQL statement of a process.
    * View query plan of a currently running SELECT statement.
    * View locks held by a process.
    * View user table statistics.
    * View user index statistics.

Download pg_top from below link .


In this blog i am building pg_top from source code .

Below are the steps how to install and configure it .

Note : - I am assuming that you have already up and running PostgreSQL server 

Here Installation begins :- 

unzip master.zip

cd pg_top-master

##Execute autogen.sh

sh autogen.sh

##Make sure you have properly set environment variable if not then execute below export statement else ignore it.

export LD_LIBRARY_PATH=$LD_LIBRARY_PATH:/usr/local/Postgresql9.6/lib/
export PATH=/usr/local/Postgresql9.6/bin/:$PATH

##Build the source code and install it.
##If you are not using --prefix then default path of installed binary is /usr/local/bin

./configure --prefix=/usr/local/Postgresql9.6/

make

make install


Here Configuration begins : -

Below is various checks of pg_top

[postgres@tushar-test bin]$ ./pg_top --help
pg_top monitors a PostgreSQL database cluster.

Usage:
  pg_top [OPTION]... [NUMBER]

Options:
  -b, --batch               use batch mode
  -c, --show-command        display command name of each process
  -C, --color-mode          turn off color mode
  -i, --interactive         use interactive mode
  -I, --hide-idle           hide idle processes
  -n, --non-interactive     use non-interactive mode
  -o, --order-field=FIELD   select sort order
  -q, --quick-mode          modify schedule priority
                            usable only by root
  -r, --remote-mode         activate remote mode
  -s, --set-delay=SECOND    set delay between screen updates
  -T, --show-tags           show color tags
  -u, --show-uid            show UID instead of username
  -V, --version             output version information, then exit
  -x, --set-display=COUNT   set maximum number of displays
                            exit once this number is reached
  -z, --show-username=NAME  display only processes owned by given
                            username
  -?, --help                show this help, then exit

Connection options:
  -d, --dbname=DBNAME       database to connect to
  -h, --host=HOSTNAME       database server host or socket directory
  -p, --port=PORT           database server port
  -U, --username=USERNAME   user name to connect as
  -W, --password            force password prompt


  • How to make a DB connection with pg_top


Below are some of the run-time switches .

A       - EXPLAIN ANALYZE (UPDATE/DELETE safe)\n\
X       - show user index statistics\n\
L       - show locks held by a process\n\
R       - show user table statistics\n\
S       - show pg_stat_statements statistics\n\
Q       - show current query of a process\n\
t        - Toggle between cumulative or differential statistics when viewing\n\

More run time switches are available on below link .


Tuesday 31 October 2017

PostgreSQL | BARMAN (Backup and recovery Manager)

Here again i am trying to explore another backup and recovery tool for PostgreSQL that is BARMAN Earlier i have tried PgBackRest

So ,Lets start with the BARMAN .

Below is features of BARMAN .
  • Full hot physical backup of a PostgreSQL server
  • Point-In-Time-Recovery (PITR)
  • Management of multiple PostgreSQL servers
  • Remote backup of a PostgreSQL server
  • Remote recovery of a backup for a PostgreSQL server
  • Management of base backups and WAL files through a catalog
  • ssh support for remote operations
  • rsync over ssh support for file synchronisation and transfers
  • Management of retention policies for backups and WAL files
  • Incremental backup
  • WAL hub (get-wal)
  • Compression of WAL files (bzip2, gzip or custom)
  • Backup general and disk usage information
  • Integration with standard archiving tools (e.g. tar)
  • Local recovery
  • Relocation of PGDATA and tablespaces at recovery time
  • Server diagnostics for backup
  • Server status and information
  • Pre/Post backup hook scripts
  • Local storage of metadata
  • INI configuration file
  • Written in Python
  • Control of bandwidth usage
Below are packages should be with you . 

  • Linux/Unix
  • Python 2.6 or 2.7
  • Python modules:
    • argcomplete
    • argh >= 0.21.2 <= 0.26.2
    • argparse (Python 2.6 only)
    • psycopg2 >= 2.4.2
    • python-dateutil <> 2.0
    • setuptools
  • PostgreSQL >= 8.3
  • rsync >= 3.0.4 (optional for PostgreSQL >= 9.2)
Note : Password less (SSH) login should be in place between DB server and BARMAN server .

Below are steps to install python and related packages . 


yum install -y centos-release-SCL
yum install -y python27
yum install python-six
yum install python-argparse
yum install python-argcomplete
yum install python-argh

curl "https://bootstrap.pypa.io/get-pip.py" -o "get-pip.py"
python get-pip.py


https://pypi.python.org/pypi/python-dateutil/2.6.1
tar -xvf python-dateutil-2.6.1.tar.gz
python setup.py build
python setup.py install


pip install -U pip
pip install psycopg2

pip install argh
pip install argcomplete

Below are the steps to install BARMAN


https://sourceforge.net/projects/pgbarman/?source=typ_redirect
tar -xvf barman-2.3.tar.gz
export LD_LIBRARY_PATH=$LD_LIBRARY_PATH:/opt/PostgreSQL9.6S/lib
export PATH=/opt/PostgreSQL9.6S/bin/:$PATH
python setup.py build
python setup.py install

useradd -m -d /home/barman/ barman

chown barman:root /etc/barman

mkdir -p /etc/barman

cp /barman-2.3/doc/barman.conf /etc/barman


Parameters need to adjust in barman.conf
Global section of in barman.conf ,Global section name is [barman]

[barman]
barman_home = /var/lib/barman   - Backup and wal path
barman_user = barman
log_file = /var/log/barman/barman.log - Log file
compression = gzip
minimum_redundancy = 1
immediate_checkpoint = true

DB- server section from barman.conf 
pg-remote is server name i have given .

[pg-remote]
description =  "PostgreSQL Server"
ssh_command = ssh postgres@192.168.213.141
conninfo = host=192.168.213.141 user=postgres  port=5411
archiver=on
streaming_archiver = off
reuse_backup = link

Parameters need to adjust in postgresql.conf and pg_hba.conf on DB server .


postgresql.conf entries 

listen_addresses = *
max_wal_senders = 3
archive_mode = on
wal_level=logical/replica/archive
archive_command =  rsync -a %p barman@192.168.213.236:/var/lib/barman/pg-remote/incoming/%f

To get location of wal_dir on barman server ,Execute below command 
//barman show-server pg-remote |grep incoming_wals_directory 
//incoming_wals_directory: /var/lib/barman/pg-remote/incoming/

pg_hba.conf entries 

Allow replication user connection from that server .

host     all     all               192.168.213.236/32      trust
host     replication     postgres               192.168.213.236/32      trust

Execute below command 

/usr/bin/barman archive-wal pg-remote

Where pg-remote is server name .

Below image shows some of the ,Examples .

/usr/bin/barman archive-wal pg-remote
/usr/bin/barman check pg-remote
/usr/bin/barman list-server
/usr/bin/barman status pg-remote
/usr/bin/barman show-server pg-remote 


Now we will take a backup for one server . 

/usr/bin/barman backup pg-remote


List out the backups ,By using below commands .


Now,Lets restore some backup of remote host .


Friday 29 September 2017

PostgreSQL foreign data wrapper for MS-SQL-Server "tds_fdw"

To implement cross database connection from PostgreSQL toward MS-SQL Server you need yo configure tds_fdw (This is a PostgreSQL foreign data wrapper that can connect to databases that use the Tabular Data Stream (TDS) protocol, such as Sybase databases and Microsoft SQL server.) 


This should support PostgreSQL 9.2+.


The current version does not yet support JOIN push-down, or write operations.


It does support WHERE and column pushdowns when match_column_names is enabled.


--------------------------------------------------------------------------------------------------------------------------


Following are the steps how to implement FDW with PostgreSQL to perform operation on MS-SQL-Server Database .

I am considering below things are with you .

  • PostgreSQL DB server up and running ((9.2 And above).
  • MS-SQL server up and running .

1) Steps to install tds_fdw extension
Download tds_fdw from git 

git clone https://github.com/GeoffMontee/tds_fdw.git
cd tds_fdw

Install some prerequisites package .

sudo yum install epel-release
yum install freetds freetds-devel

Start installation for  tds_fdw

export PATH=/opt/PostgreSQL/9.5/bin/:$PATH       //PostgreSQL binary path .
make USE_PGXS=1
make USE_PGXS=1 install

2) Install/Create extension inside database .

- Create  tds_fdw extension in PostgreSQL database .

CREATE EXTENSION tds_fdw;
Create server object

CREATE SERVER mssql_svr
   FOREIGN DATA WRAPPER tds_fdw
   OPTIONS (servername '192.168.213.136', port '1433', database 'test' );

Where 
     
      Server Name - Is IP address of MS-SQL server where it's running .
      Port - MS-SQL server's port on which it's accepting connection.
      Database - MS-SQL Database Name which need to connect from PostgreSQL

- Create user mapping

CREATE USER MAPPING FOR postgres
   SERVER mssql_svr
   OPTIONS (username 'SA', password 'crossconn1');

Where  

     User Name  - SA is user name of MS-SQL DB user .
     Password     - is MS-SQL DB user's password . 

Create foreign table


CREATE FOREIGN TABLE employee (
   id integer,
   name varchar(50),role varchar(50),Address varchar(50))
   SERVER mssql_svr
   OPTIONS (schema_name 'dbo', table_name 'employee');

Where 

    Schema_Name - Schema name from database of MS-SQL server .
    Table Name - Table Name which you want to access from MS-SQL Server .

3) Verify all this created or not .

Below image contain all .


4) Fetch data from MS-SQL into PostgreSQL .

Below image show it .


Tuesday 22 August 2017

PostgreSQL pg_stat_statement | SQL Monitoring

*        What is pg_stat_statement : -

The pg_stat_statements module provides a means for tracking execution statistics of all SQL statements executed by a server.

It provides below information for each individual SQL.

OID of user who executed the statement
OID of database in which the statement was executed
Internal hash code, computed from the statement's parse tree
Text of a representative statement
Number of times executed
Total time spent in the statement, in milliseconds
Total number of rows retrieved or affected by the statement
Total number of shared block cache hits by the statement
Total number of shared blocks read by the statement
Total number of shared blocks dirtied by the statement
Total number of shared blocks written by the statement
Total number of local block cache hits by the statement
Total number of local blocks read by the statement
Total number of local blocks dirtied by the statement
Total number of local blocks written by the statement
Total number of temp blocks read by the statement
Total number of temp blocks written by the statement
Total time the statement spent reading blocks, in milliseconds (if track_io_timing is enabled, otherwise zero)
Total time the statement spent writing blocks, in milliseconds (if track_io_timing is enabled, otherwise zero)

*        Installation of pg_stat_statement :-

Step 1


create extension pg_stat_statements ;


Step 2
Add below entries into postgresql.conf

shared_preload_libraries = 'pg_stat_statements'
pg_stat_statements.max = 10000
pg_stat_statements.track = all

Then Restart PostgreSQL service.

*        Configuration Parameters: -

A) pg_stat_statements.max (integer)

pg_stat_statements.max is the maximum number of statements tracked by the module (i.e., the maximum number of rows in the pg_stat_statements view). If more distinct statements than that are observed, information about the least-executed statements is discarded. The default value is 5000. This parameter can only be set at server start.

B) pg_stat_statements.track (enum)

pg_stat_statements.track controls which statements are counted by the module. Specify top to track top-level statements (those issued directly by clients), all to also track nested statements (such as statements invoked within functions), or none to disable statement statistics collection. The default value is top. Only superusers can change this setting.

C) pg_stat_statements.track_utility (boolean)

pg_stat_statements.track_utility controls whether utility commands are tracked by the module. Utility commands are all those other than SELECT, INSERT, UPDATE and DELETE. The default value is on. Only superusers can change this setting.

D) pg_stat_statements.save (boolean)

pg_stat_statements.save specifies whether to save statement statistics across server shutdowns. If it is off then statistics are not saved at shutdown nor reloaded at server start. The default value is on. This parameter can only be set in the postgresql.conf file or on the server command line.

The module requires additional shared memory proportional to pg_stat_statements.max. Note that this memory is consumed whenever the module is loaded, even if pg_stat_statements.track is set to none.

*        Functions : -

A) pg_stat_statements_reset() returns void

pg_stat_statements_reset discards all statistics gathered so far by pg_stat_statements. By default, this function can only be executed by superusers.

B) pg_stat_statements(showtext boolean) returns setof record

The pg_stat_statements view is defined in terms of a function also named pg_stat_statements.

*        The pg_stat_statements view: -

The statistics gathered by the module are made available via a system view named pg_stat_statements. This view contains one row for each distinct database ID, user ID and query ID (up to the maximum number of distinct statements that the module can track).

*        Reference Queries -  

1)

Select * from pg_stat_statements ;

2)

SELECT  substring(query, 1, 50) AS short_query,
round(total_time::numeric, 2) AS total_time,
calls,
round(mean_time::numeric, 2) AS mean,
round((100 * total_time /
sum(total_time::numeric) OVER ())::numeric, 2) AS percentage_cpu
FROM    pg_stat_statements
ORDER BY total_time DESC
LIMIT 20;


3)

select userid,query,calls,total_time from pg_stat_statements;

4)

select * from pg_stat_statements(true);